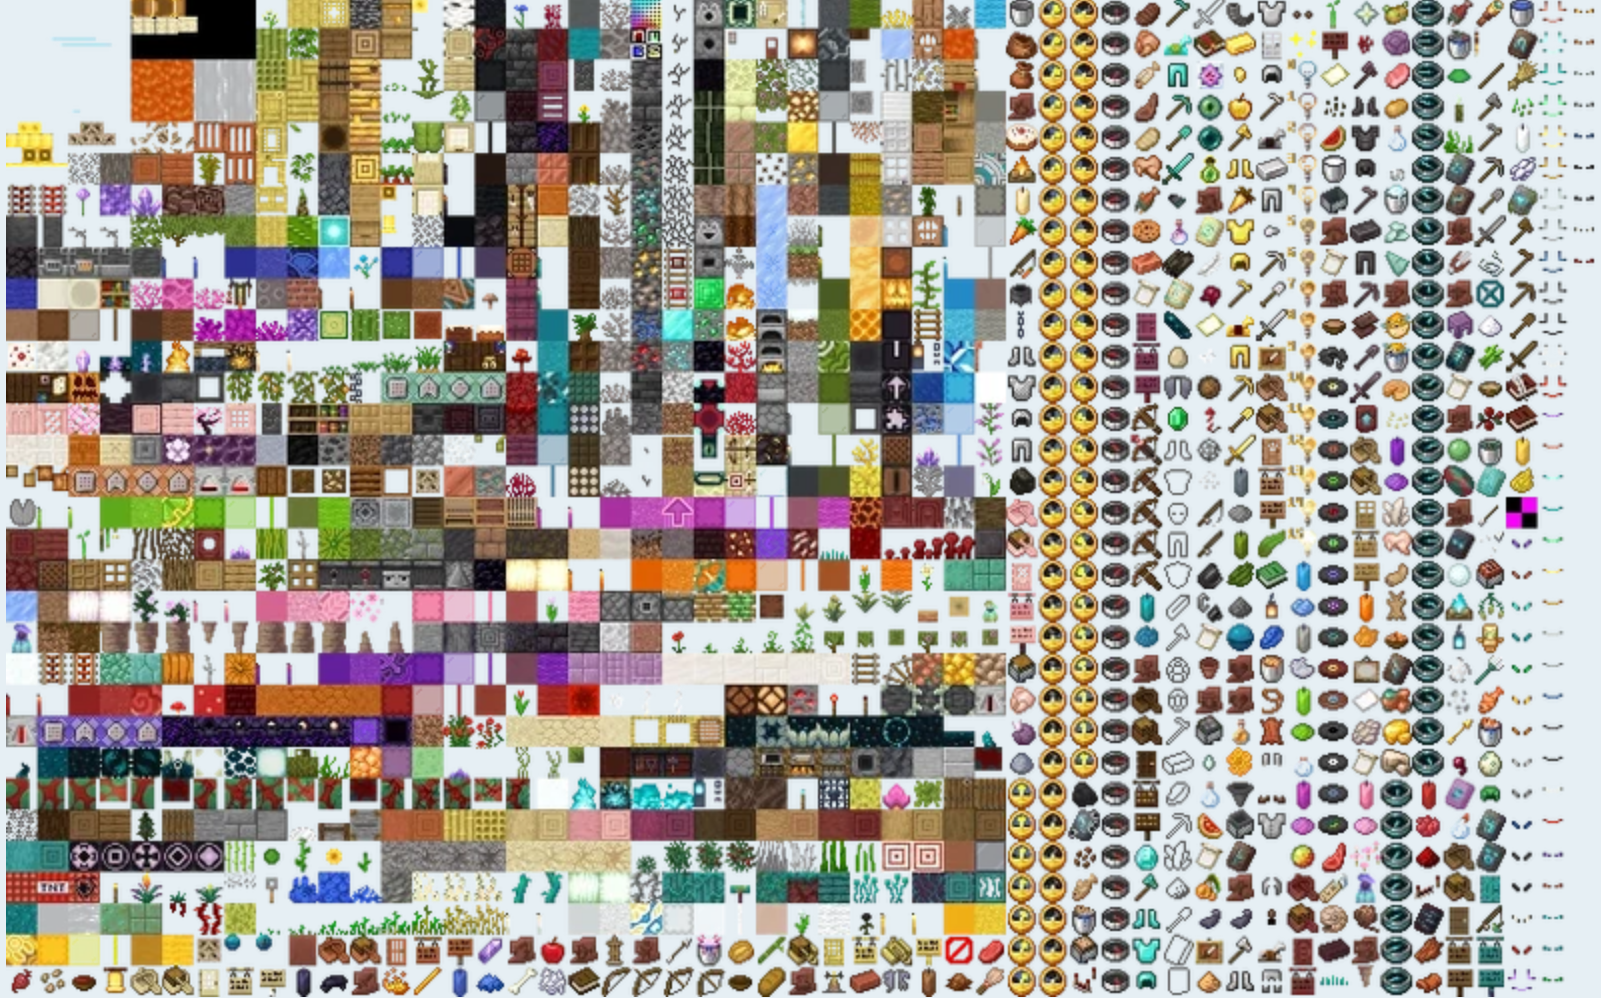
纹理图集(TextureAtlas)
让我们先来假象一个场景:
一位优质的模组开发者正在设计一个文件盒。按照设计,这个盒子可以存入指定的,任意数量本附魔书,并且会根据存放的数量占最大数量的比值在方块内指定高度渲染一张没有被任何模型引用的材质。
他的想法是:使用BlockEntityRenderer,根据方块的位置处理PoseStack的位置,计算四个顶点,然后通过资源路径将材质绑定到顶点上,从而渲染出这张贴图。
提问:在不考虑代码问题的前提下,这个流程是否完整?
有异议!(拍桌) 这一过程存在一个致命的缺陷: 我们可以注意到,整个过程中没有绑定过贴图,顶点信息里也不需要指定贴图:
public void render(BlueprintReduceBoxBE be, float partialTicks, MatrixStack matrixStackIn, IRenderTypeBuffer bufferIn, int combinedLightIn, int combinedOverlayIn){
    matrixStackIn.pushPose();
    matrixStackIn.translate(0.5, 0, 0.5);
    matrixStackIn.mulPose(be.getBlockState().getValue(BlockStateProperties.HORIZONTAL_FACING).getRotation());
    matrixStackIn.scale(0.0625F, 0.0625F, 0.0625F);

    TextureAtlasSprite i = someMethod();

    BufferBuilder buffer = (BufferBuilder) bufferIn.getBuffer(RenderType.cutout());
    if (be.getCount() != 0) {
        float height = 1 + 8 * ((float)be.getCount()/be.getMaxContain());

        Matrix4f m4f = matrixStackIn.last().pose();
        buffer.vertex(m4f, -6, -6, -height).color(255, 255, 255, 255).uv(i.getU0(), center)
                .uv2(combinedLightIn).normal(0, 0, 1).endVertex();
        buffer.vertex(m4f, -6, 6, -height).color(255, 255, 255, 255).uv(i.getU0(), i.getV0())
                .uv2(combinedLightIn).normal(0, 0, 1).endVertex();
        buffer.vertex(m4f, 6, 6, -height).color(255, 255, 255, 255).uv(u1, i.getV0())
                .uv2(combinedLightIn).normal(0, 0, 1).endVertex();
        buffer.vertex(m4f, 6, -6, -height).color(255, 255, 255, 255).uv(u1, center)
                .uv2(combinedLightIn).normal(0, 0, 1).endVertex();

    }
    matrixStackIn.popPose();
}
以及,这个TextureAtlasSprite要从哪里获取?
这就要说到这篇的主题:TextureAtlas
附:没有选择哪一张atlas是因为这东西在RenderType里设置了
什么是TextureAtlas?
TextureAtlas又名纹理图集,简单来说就是把大量材质缝合进一张图片,以减少文件读写的性能开销,提高渲染速度,这是绝大部分游戏都会使用的一种方法。它看上去就像这样:  当然 这张图不完整,很显然有一些物品仍然没有包含在内。在Minecraft游戏原版中,注册了多个TextureAtlas,其中最常用的为BLOCK_ATLAS(
"textures/atlas/blocks.png"),其内容包含方块,物品(包括模组额外注册的),潮涌核心,钟,锻造模板等。
在上述的例子中,其所绑定的uv默认就是BLOCK_ATLAS上的uv位置; TextureAtlasSprite则包含了其在该纹理图集中的相对位置。这些东西都可以通过对应的TextureAtlas获取。
获取TextureAtlas
在游戏完成加载后,我们将可以使用
public void someMethod(){
    //...
    Minecraft.getInstance().getTextureAtlas(InventoryMenu.BLOCK_ATLAS).apply(/**你的资源路径*/);
    //注:在lexforge1.20.1中,InventoryMenu.BLOCK_ATLAS应替换为PlayerContainer.BLOCK_ATLAS
}获取到对应的TextureAtlasSprite。这个类中包含了一些基本的材质背景数据以及其在对应的TextureAtlas中的相对位置。同理,你可以用这个方法获取到物品,方块等的贴图。
向TextureAtlas上附加材质
在这里我们介绍使用datagen生成我们需要的atlas/xxx.json。如果您想自己手动完成对应的json文件,请直接参考生成出的内容。
如下,给出代码示例:
public class MaterialSpriteAttachGen extends SpriteSourceProvider {
    public MaterialSpriteAttachGen(PackOutput output, CompletableFuture<HolderLookup.Provider> lookupProvider, ExistingFileHelper existingFileHelper) {
        super(output, lookupProvider, BreakdownCore.MODID, existingFileHelper);
    }

    @Override
    protected void gather() {
        SourceList sourceList = atlas(BLOCKS_ATLAS);
        for(Material material : Registry$Material.MATERIAL){
            sourceList.addSource(new SingleFile(material.id.withPath(id -> "brea/material/" + id), Optional.empty()));
        }
        for(MaterialItemType type : Registry$Material.MATERIAL_ITEM_TYPE){
            sourceList.addSource(new SingleFile(type.id.withPath(s -> "brea/mit/" + s),Optional.empty()));
            if(this.existingFileHelper.exists(type.id.withPath(s -> "textures/brea/mit_cover/" + s + ".png"), PackType.CLIENT_RESOURCES)){
                sourceList.addSource(new SingleFile(type.id.withPath(s -> "brea/mit_cover/" + s),Optional.empty()));
            }
        }

        sourceList.addSource(new DirectoryLister("brea/material","brea/material/"));
        sourceList.addSource(new DirectoryLister("brea/mit","brea/mit/"));
        sourceList.addSource(new DirectoryLister("brea/mit_cover","brea/mit_cover/"));
    }
}在这个类中,SpriteSourceProvider专门用于处理生成atlases附加的类。我们覆写gather方法:
- 通过atlas方法,传入指定的,需要附加内容的
TextureAtlas路径,获取一个SourceList。我们需要把接下来获取的资源全都加入这个SourceList中。 - 在
Material的遍历中,我向sourceList中添加了一个SingleFile也就是单个文件。这里需要两个参数,第一个是指定贴图的资源路径,第二个为一个Optional资源路径:若此项不为空,则会将对应的材质以此项获取到的资源路径为id进行注册,否则则使用贴图资源的路径作为id。 - 在
MaterialItemType的遍历中,我使用了ExistingFileHelper对指定目录下的文件的存在性进行检验。如果存在则进行注册 - 最后我添加了几个
DirectoryLister。这一类可以添加指定路径下的所有材质。其中第一个参数指定其材质下的路径前缀,第二个参数指定其在注册时的id前缀。比如说,我在assets下存在arkdust/textures/brea/material/orirock.png, wf/textures/brea/material/dark_crystal.png, minecraft/textures/brea/material/iron.png
这时我使用new DirectoryLister("brea/material","mat/"),这三个文件虽然位于不同modid的包下(arkdust,wf,minecraft),但都会被获取到。
在这一基础上,它们将会被进行额外处理:首先裁切路径前缀,文件拓展名后缀并转换为资源路径,以第一个为例,变为arkdust:orirock;再添加注册id前缀,变为arkdust:mat/orirock。这就是最终将会被注册进这个textureAtlas的名字。
需要注意的是,当您使用datagen生成模型指定资源路径时,路径查找将会将其默认为包下的材质资源的实际路径;而游戏在加载模型时,则会以这个路径去获取TextureAtlas中的材质。因此,像上面这个例子给出的示例有可能会导致您使用datagen生成的模型出现材质缺失,或者材质路径正确的模型被判定为材质缺失。
为了避免这个问题,您应当使两个参数保持路径等价,即new DirectoryLister("brea/material","brea/material/")。或修改模型生成的生成器材质表的访问权限后绕过资源存在判断直接添加材质资源路径。
您可以查看assets\minecraft\atlases\blocks.json来观察原版是如何使用json文件为TextureAtlas添加材质的。也可以查看SpriteSource的实现来获取更多可用的类。
需要注意的是,这一过程不会创建新的TextureAtlas,也就是说您不能用它来创建一个新的,自定义的纹理图集。
深层加载逻辑(仅阅读)
现在我们还有一个小问题:如何自定义一个纹理图集?
要搞清这个问题,我们需要先来了解一下整个纹理加载的逻辑:
客户端实例初始化。在
Minecraft即客户端实例加载的过程中,将会创建一个ModelManager实例。在此实例中存在一部分atlas(噢淦为什么是一部分),而另有一部分,比如粒子,画,药水效果等又有独立的注册。javapublic Minecraft(GameConfig pGameConfig) { super("Client"); instance = this; //...... this.modelManager = new ModelManager(this.textureManager, this.blockColors, this.options.mipmapLevels().get()); this.resourceManager.registerReloadListener(this.modelManager); //...... this.resourceManager.registerReloadListener(this.searchRegistry); this.particleEngine = new ParticleEngine(this.level, this.textureManager); net.neoforged.neoforge.client.ClientHooks.onRegisterParticleProviders(this.particleEngine); this.resourceManager.registerReloadListener(this.particleEngine); this.paintingTextures = new PaintingTextureManager(this.textureManager); this.resourceManager.registerReloadListener(this.paintingTextures); this.mobEffectTextures = new MobEffectTextureManager(this.textureManager); this.resourceManager.registerReloadListener(this.mobEffectTextures); this.guiSprites = new GuiSpriteManager(this.textureManager); this.resourceManager.registerReloadListener(this.guiSprites); //...... }这看起来真的很抽象,让我们一个一个来:
对于
ModelManager中的部分,对,它真的在模型管理器内。在创建ModelManager实例时,存在如下代码:javapublic ModelManager(TextureManager pTextureManager, BlockColors pBlockColors, int pMaxMipmapLevels) { this.blockColors = pBlockColors; this.maxMipmapLevels = pMaxMipmapLevels; this.blockModelShaper = new BlockModelShaper(this); this.atlases = new AtlasSet(VANILLA_ATLASES, pTextureManager); }其中创建了一个
AtlasSet,VANILLA_ATLASES包含了多组原版纹理图集的信息,但此时只有名字和暂存路径,还没有加载任何子纹理,纹理的加载会在之后由ResourceManager统一处理。在这之中,
AtlasSet为每个id创建空白的TextureAtlas模板并注册,最后存入表中,在资源重载时处理。而对于其它
TextureAtlasHolder(及其实现),大致逻辑也是相同的。它们每个只存储一种TextureAtlas,在创建时自动完成注册,并等待资源重载时处理。在之后我们会用这种方法创建我们的自定义纹理图集。
这些内容均被注册入了
ResourceManager。在需要重载时,将会统一调度处理。在资源重载时,两种方式生产的
TextureAtlas所执行的内容也较为相似:java//in TextureAtlasHolder @Override public final CompletableFuture<Void> reload( PreparableReloadListener.PreparationBarrier pPreparationBarrier, ResourceManager pResourceManager, ProfilerFiller pPreparationsProfiler, ProfilerFiller pReloadProfiler, Executor pBackgroundExecutor, Executor pGameExecutor ) { return SpriteLoader.create(this.textureAtlas) .loadAndStitch(pResourceManager, this.atlasInfoLocation, 0, pBackgroundExecutor, this.metadataSections) .thenCompose(SpriteLoader.Preparations::waitForUpload) .thenCompose(pPreparationBarrier::wait) .thenAcceptAsync(p_249246_ -> this.apply(p_249246_, pReloadProfiler), pGameExecutor); } //in AtlasSet public Map<ResourceLocation, CompletableFuture<AtlasSet.StitchResult>> scheduleLoad(ResourceManager pResourceManager, int pMipLevel, Executor pExecutor) { return this.atlases .entrySet() .stream() .collect( Collectors.toMap( Entry::getKey, p_261401_ -> { AtlasSet.AtlasEntry atlasset$atlasentry = (AtlasSet.AtlasEntry)p_261401_.getValue(); return SpriteLoader.create(atlasset$atlasentry.atlas) .loadAndStitch(pResourceManager, atlasset$atlasentry.atlasInfoLocation, pMipLevel, pExecutor) .thenApply(p_250418_ -> new AtlasSet.StitchResult(atlasset$atlasentry.atlas, p_250418_)); } ) ); }不难看出,其二者都使用
SpriteLoader为指定的纹理图集创建了一个处理器,用于异步处理资源的加载。在这之后,都调用了loadAndStitch(两个形参不同签名相同的方法,但其中一个是以默认参数调用了另一个,我们就把它们视作一个即可),在执行一些其它的异步任务。我们来看看
loadAndStitch方法,如果我们需要对我们的纹理进行加载层面的动态处理,我们就需要调整这个。javapublic CompletableFuture<SpriteLoader.Preparations> loadAndStitch( ResourceManager pResourceManager, ResourceLocation pLocation, int pMipLevel, Executor pExecutor, Collection<MetadataSectionSerializer<?>> pSectionSerializers ) { //首先创建SpriteResourceLoader。这是一个接口,使用create方法创建其默认实现,也就是直接读取材质转化为NativeImage,并在动画处理加工后包装成SpriteContents。 //SpriteContents包含了这个材质的基本信息,包括其像素大小,材质内容等。在被缝合入TextureAtlas后,我们可以在TextureAtlasSprite中找到它。 SpriteResourceLoader spriteresourceloader = SpriteResourceLoader.create(pSectionSerializers); return CompletableFuture.<List<Function<SpriteResourceLoader, SpriteContents>>>supplyAsync( //创建异步任务,首先由SpriteSourceList根据id获取对应的json配置文件,再由文件获取到贴图的内容提供器。 //有意思的是,在list过程中进行处理的正是上面我们提到过的SpriteSource的实现。它们在这一步生效,根据我们提供的目录转换出贴图内容提供器。 () -> SpriteSourceList.load(pResourceManager, pLocation).list(pResourceManager), pExecutor ) //调用runSpriteSuppliers。这一步就是将内容提供器交给纹理资源加载其,生成一组SpriteContents。 .thenCompose(p_293671_ -> runSpriteSuppliers(spriteresourceloader, p_293671_, pExecutor)) //最后,调用stitch方法,将这一组SpriteContents缝入TextureAtlas中。程序将会在所有SpriteContents被缝合完后,计算其相对位置并生成ResourceLocation->TextureAtlasSprite的表。 .thenApply(p_261393_ -> this.stitch(p_261393_, pMipLevel, pExecutor)); }
到这里我们的基本逻辑就已经比较明朗了。基本分两波:
注册方面,一部分由
ModelManager代为注册,另一部分则使用TextureAtlasHolder单独注册。它们都被注册进了TextureManager,也都被注册进了ResourceManager的reload处理表。加载方面,核心方法都是
loadAndStitch,首先由id获取到atlas/xxx.json的内容配置文件,然后经过SpriteSource处理转换为需要的纹理提供器,再由SpriteResourceLoader加载图像生成AtlasContents,最后使用stitch方法将内容缝合。到这一步其实生成的只是
SpriteLoader.Preparations,虽然说其实已经拥有了TextureAtlas的绝大部分功能。在合适的时间,程序会调用TextureAtlas的upload方法将内容合并进去。
对这一过程有了基本的了解后,我们就可以开始着手进行一些高级的处理了。
自定义TextureAtlas
警告
请注意:在没有特殊需求的情况下,您应当避免使用自定义的TextureAtlas。自定义的TextureAtlas原则上可用,但在实际使用过程,例如使用自定义的atlas上的材质附加给物品模型时,需要额外的配置且会导致区域 范围 大小等出现错误。请谨慎使用。
为了使用自定义TextureAtlas,我们需要创建一个TextureAtlasHolder的子类。其构造方法中要求传入TextureManager(可以在Minecraft初始化完毕后使用Minecraft.getInstance().getTextureManager()获取),atlas的暂存路径,以及atlas的id。您可以查询原版中的PaintingTextureManager类。
创建完成后,游戏将会按照id,在指定的位置索取atlas的json配置文件——就像上面的原版atlas一样。之后的缝合等内容也均会由其自动完成。
如果您需要使用一些特殊的材质处理,您可能需要覆写reload方法,并将loadAndStitch方法部分的内部逻辑进行再处理以适应您的需求。参考这篇内容获取更多关于材质动态生成的信息。
在创建好内容后,您需要监听RegisterClientReloadListenersEvent事件(Mod总线,客户端)并将一实例使用registerReloadListener方法注册即可。
额外的笔记*
使用RenderType.itemEntityTranslucentCull(您的atlas文件暂存路径)可以创建这一atlas对应的渲染类型,这解答了我们最开始提出的,"没有选择哪一张atlas"的问题。
在RegisterNamedRenderTypesEvent事件(Mod总线,客户端)中,您可以将创建的RenderType标注id并注册为一组RenderTypes,并以这个id在需要的地方(例如BlockModel中的customData.setRenderTypeHint设置渲染类型)使用。